Technique – ink blending

Featuring ink blending

Thank you posy

Hi there!

I’m playing with more products from Penny Black’s beautiful Daydream collection.

I stamped the main flower image from the Enliven mini set (30-705) before blending a light circle with distress ink. I didn’t bother masking the image as I knew I was going to be using darker colours on the petals and leaves, but I did lift off some ink using a little water.

After colouring the image with my Twinkling H2Os, I decided to add a few gold splatters. Annoyingly, as I was about to do this a large drop of water fell off my brush and into the centre of my ink-blended area. Argh! I ended up soaking up the water and adding a little more to create a whiter centre…. not what I intended but I think it worked out OK. After adding the splatters, I stamped a sentiment from the Flower Sparks set (30-281)

I was originally intending to make a square card but decided to trim down the panel to create a standard (UK A6) card and added a butterfly from the fabulous Flourish & Butterflies die set (51-198).

I’m entering this into the current Penny Black Saturday Challenge where the optional theme is Flowers.

Thanks for stopping by!

LucieG.

Bunny basket

Hi everyone!

Today I’m playing along with the sketch challenge at CAS Colours and Sketches.

Of course, I’m still making Easter cards… I really need to stop making and get them into the post now! For today’s card, I used a sweet bunny from Flora and Fauna, together with the Poppystamps Decorated Folk Eggs and Memory Box Kempsey Basket which I stuck to an oval cut from an ink blended panel. For the background stripes, I used a die from the Elizabeth Craft Designs Chains 1 dies set. The sentiment is by Clearly Besotted.

Thanks for stopping by!

LucieG.

Have a great day

Hi there!

I’m taking a little break from Easter cards to play along with this week’s Freshly Made Sketches challenge using products from Penny Black’s Daydream collection.

I masked off a section at the bottom of my card and applied a light layer of Pumice Stone distress ink before stamping the large image from the Flying Colors set (40-739) in Pumice Stone distress oxide ink.

I then cut the fabulous Viridescent leaf die (51-650) from an ink-blended panel and stuck it to my card base. The stem didn’t quite reach my ink-blended strip and so I die cut a small section again and adhered it to the card. I hid the join behind my sentiment which is from the Enliven mini set (30-705).

To complete my card, I added a few butterflies from one of my go-to die sets that I’ve had for years – Flourish & Butterflies (51-198).

Thanks for stopping by!

LucieG.

Color Throwdown – the pastel edition!

Happy Saturday!

It’s the colour palette that I’ve been training for people! You know I love my pastels and this week one of my favourite challenges, the Color Throwdown has a fabulous pastel palette  (pink, yellow, purple and aqua).

Perfect Easter colours too, don’t you think? Of course I couldn’t just stop at one card and made two this morning using dies by Simon Says Stamp, Memory Box, Poppystamps and Marianne Designs. The stamped sentiment is by Taylored Expressions.

Thanks for stopping by!

LucieG.

Pretty Eggs


Hi there!

Today I’m playing along with the challenge at Freshly Made Sketches.

As I’m still on my Easter card drive, I just had to play with my new Pretty Pink Posh Spring Eggs! I decided to use the wonderful Sunny Studios basket stamp to corral the eggs – and then at the last minute, I added a little fun chick (by Simon Says Stamp). The sentiment is also by SSS.

Thanks for stopping by!

LucieG.

One stamp, four ways – Penny Black Spring Day

Happy Sunday friends!

I’ve been making Easter cards for the past couple of weekends now – they are such fun to make, especially after last year when I only made a few…

Penny Black kindly sent me a fabulous Easter stamp set from their Daydream collection – it’s called….Spring Day (30-805). I could not wait to start creating with it!

Now, this is a big stamp, especially for me – I’m a CAS cardmaker, I rarely use large images and I love all my white space. but I also love stretching my supplies and I knew this stamp had a LOT of possibilities!

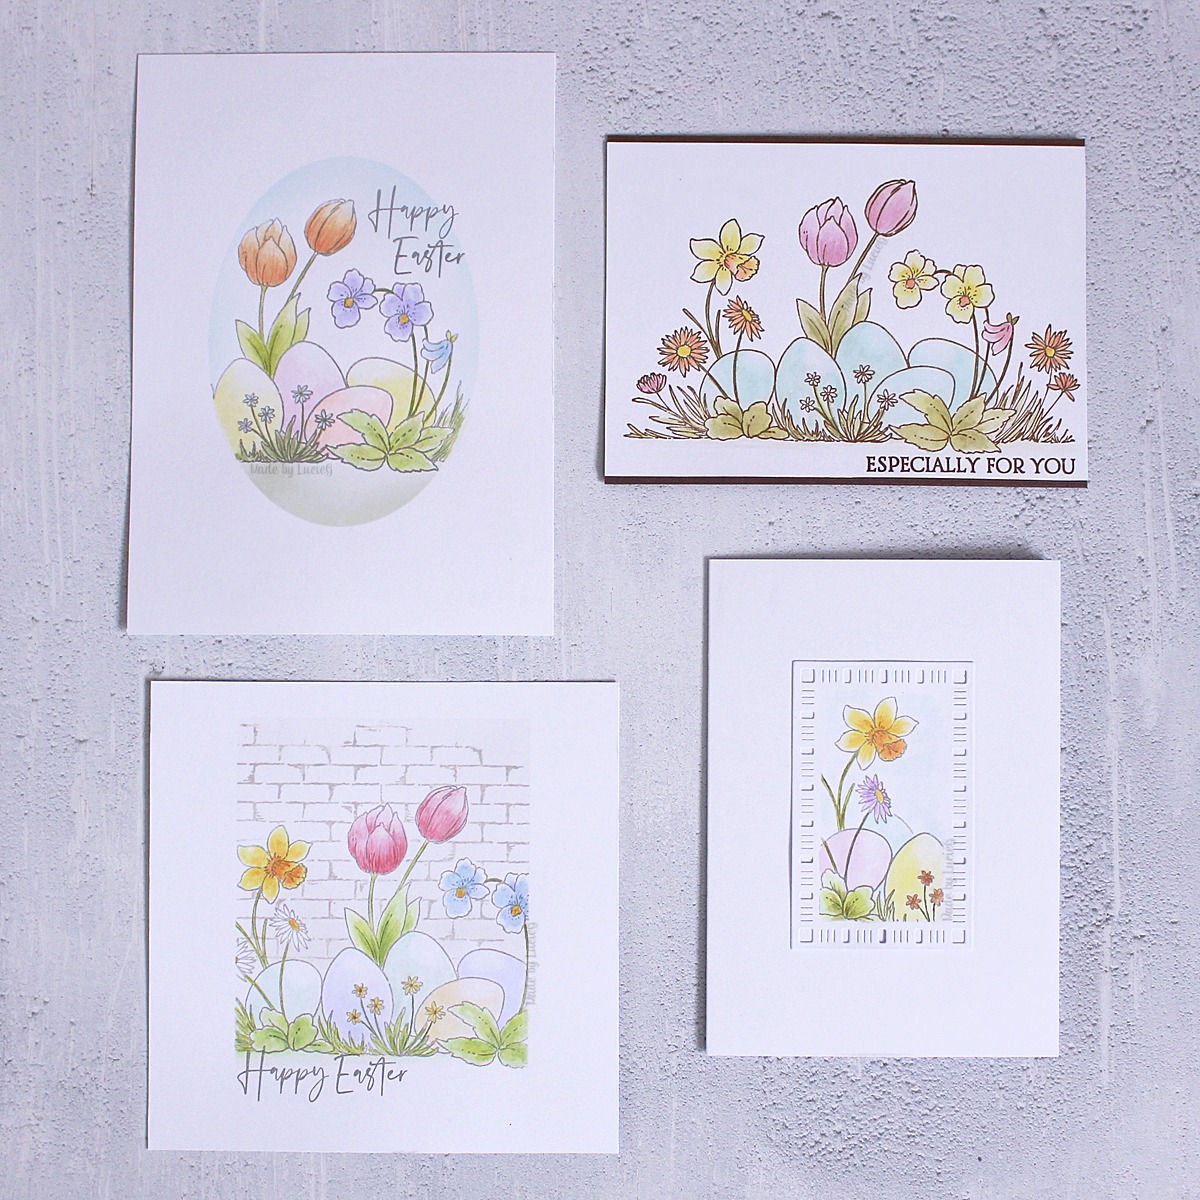
First of all, I created a card using a ‘regular’ card base – UK A6 size (4.1″x 5.8″). As the image takes up almost the whole card base, I decided to leave the background completely white… although I really wanted to add some green splatters… I may still do that! The sentiment is from the Banner Sentiments set (30-423).

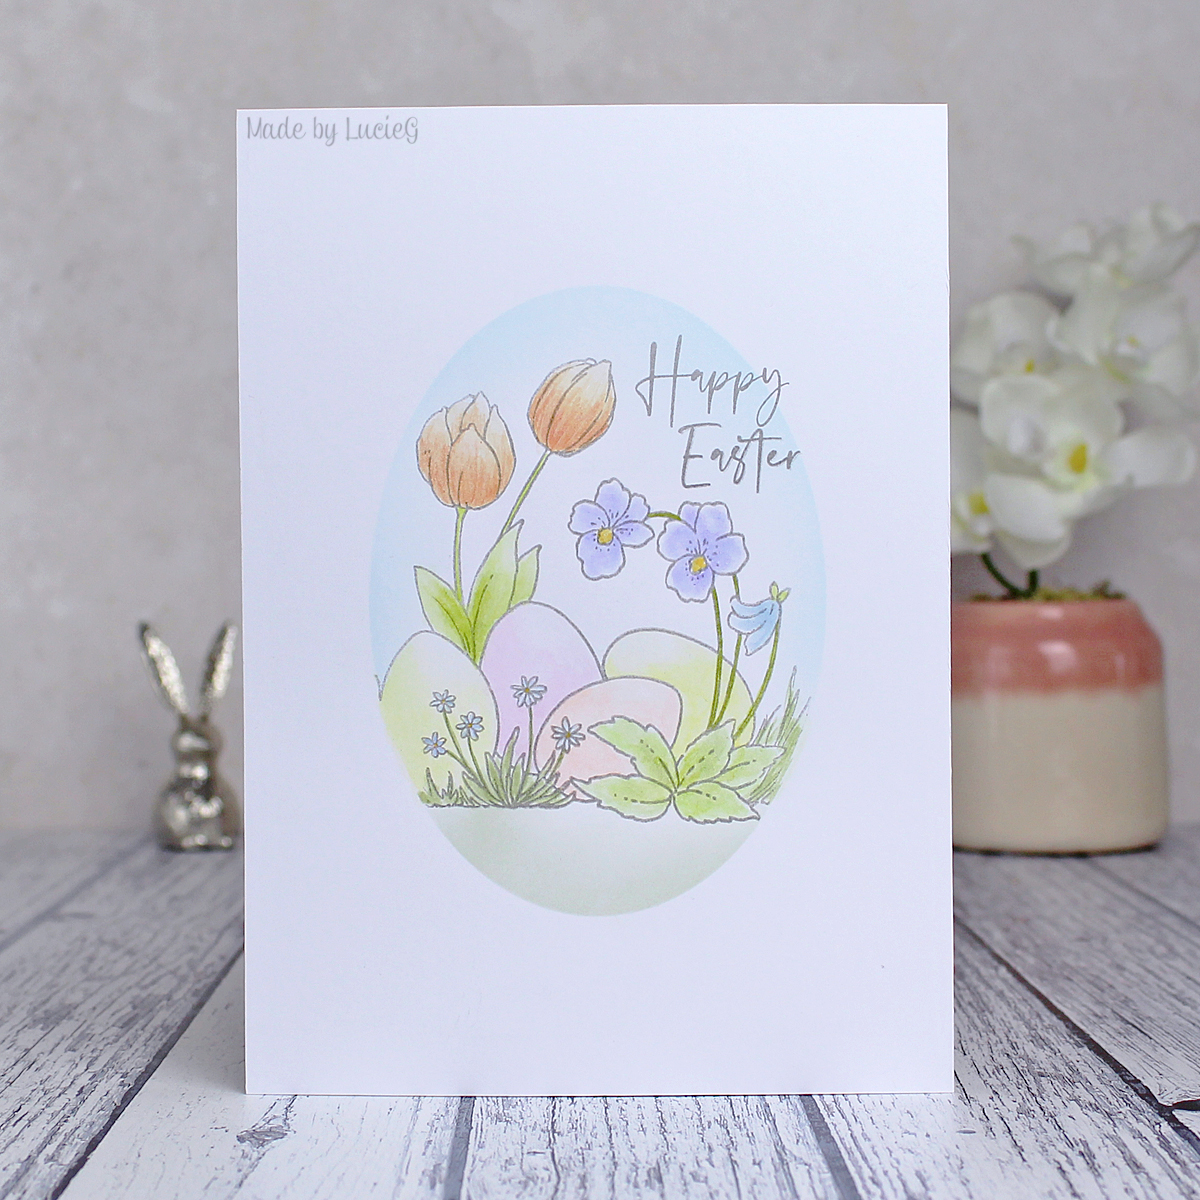
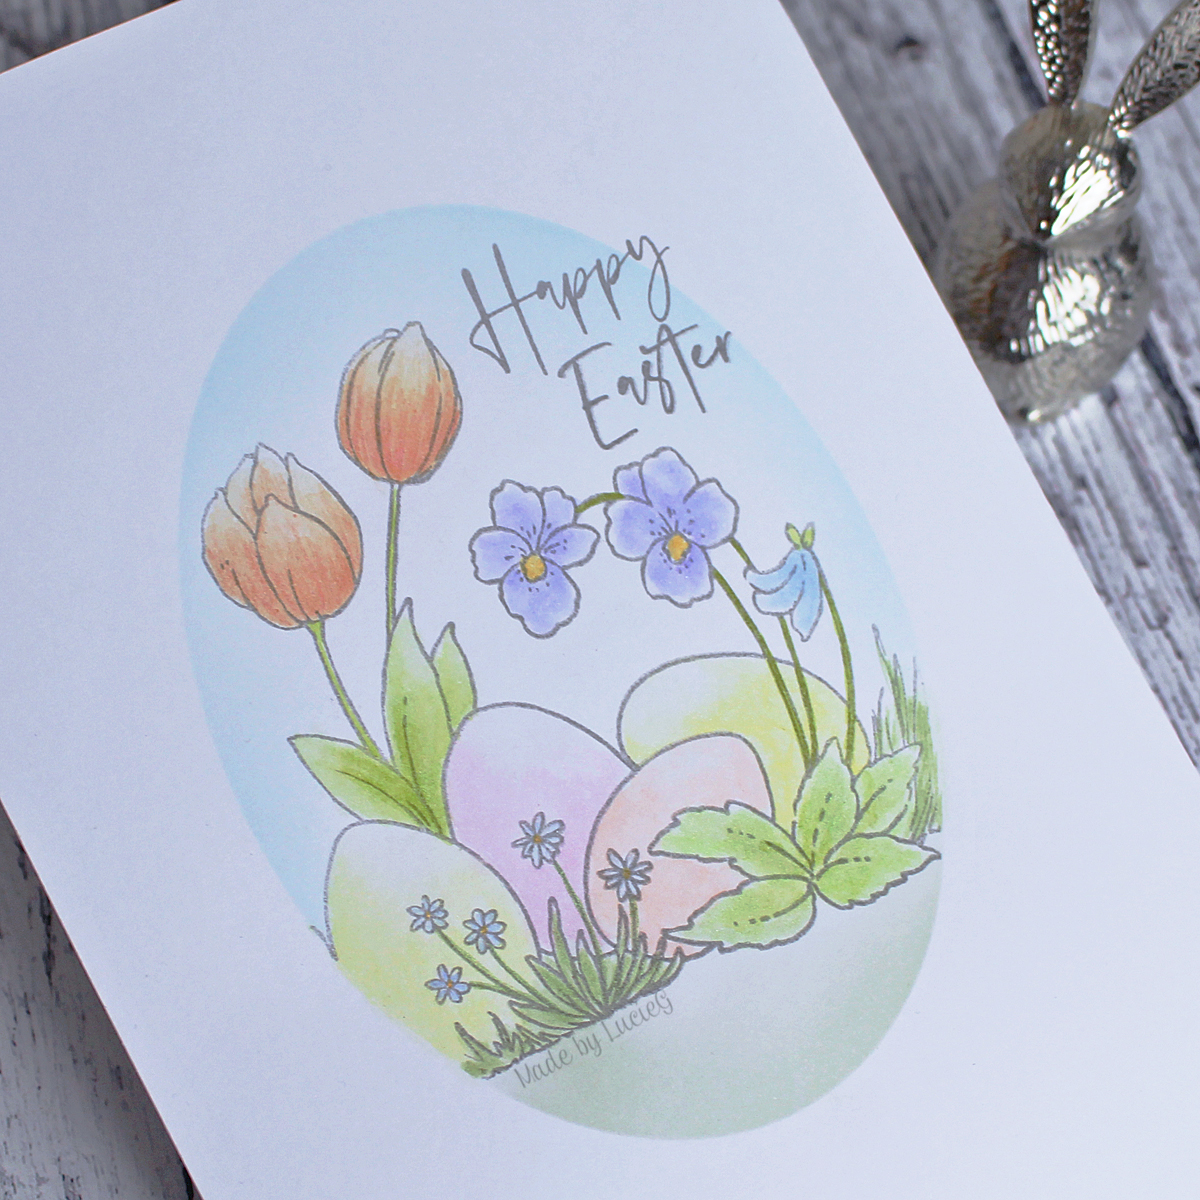
When I want to use large stamps for a CAS card, I usually increase the card dimensions. My next card uses a 7″x5″ base but I still wanted more white space…. So, I created an oval mask and stamped a section of the image. I coloured the image with distress inks and Twinkling H2Os before removing the mask. The sentiment from the Spring Day set; I simply masked off the words as I stamped them – there is no way I can ever bring myself to cut a stamp, especially a brand new one!!

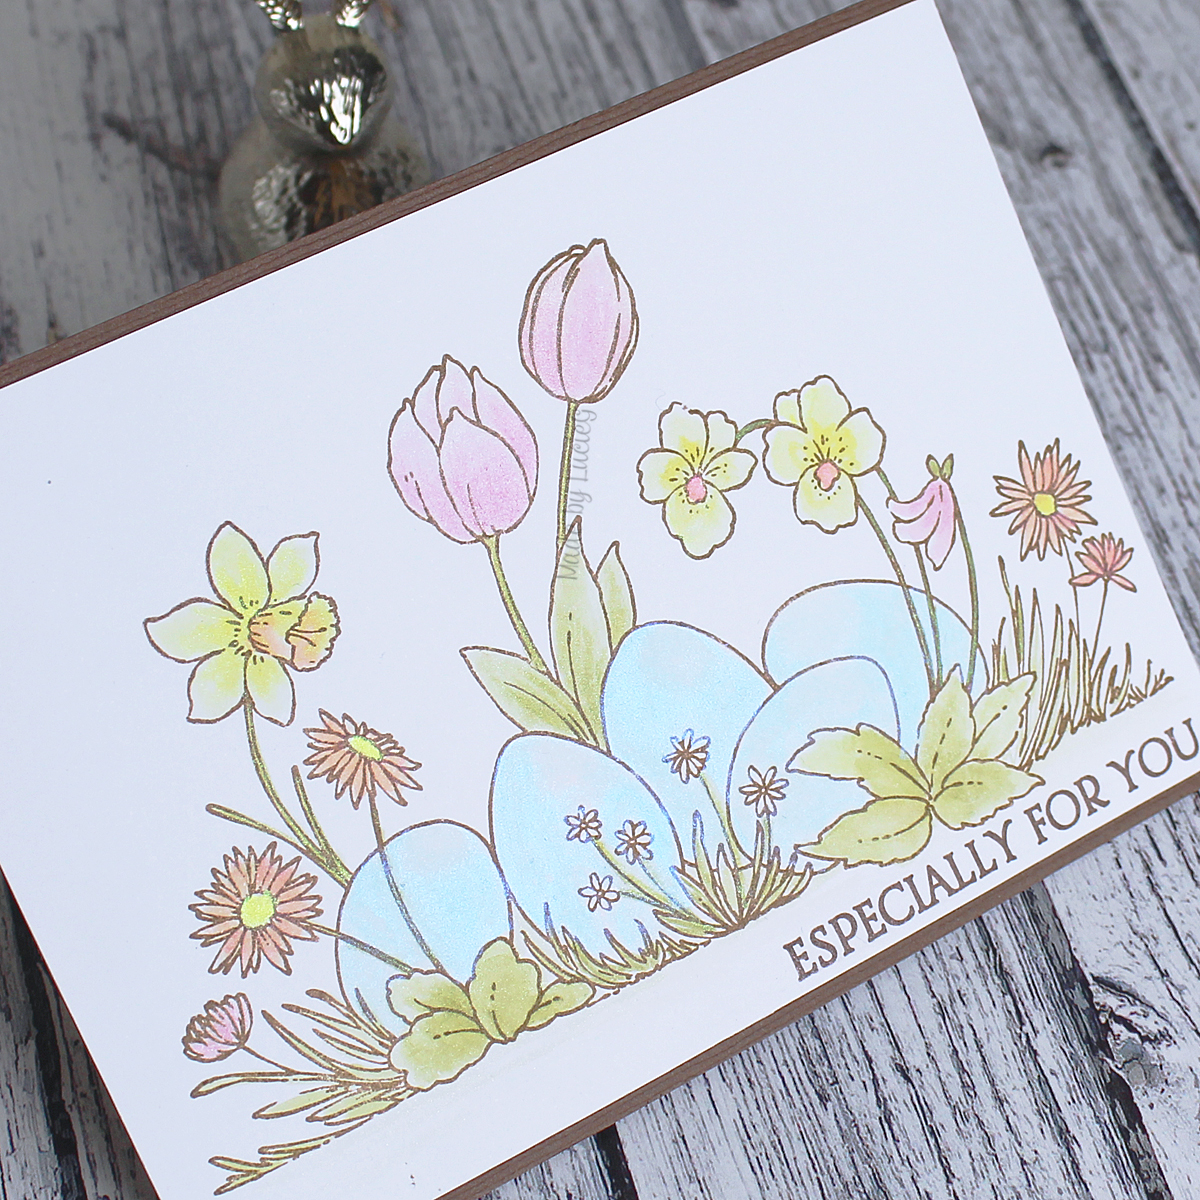
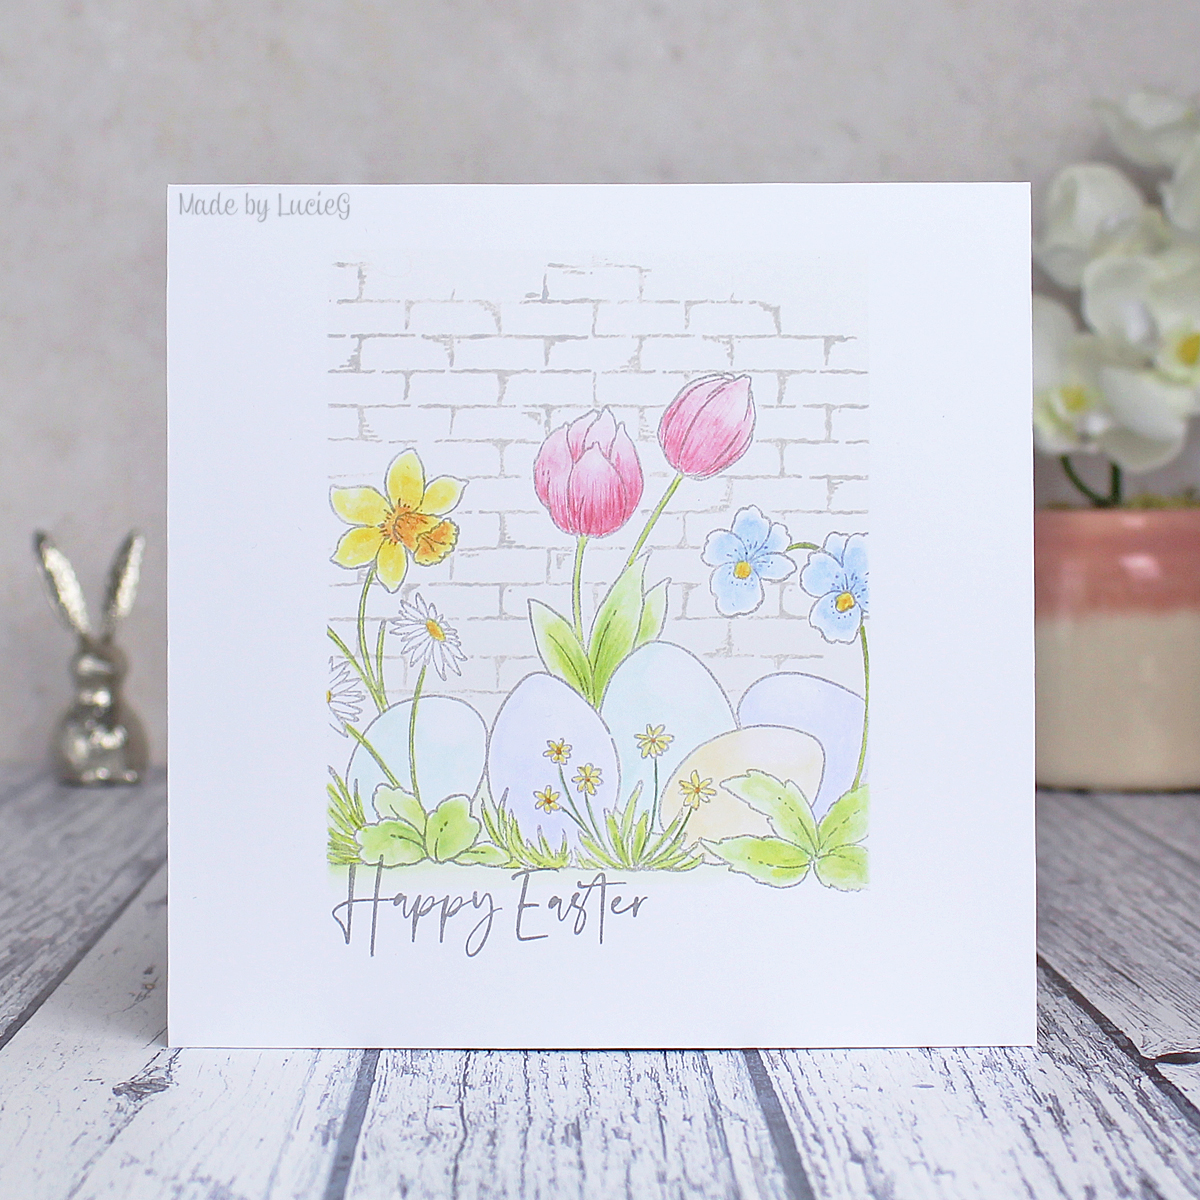
My third card uses LOTS of masking again! My card base is 5.5″ square and I masked a rectangular section before stamping part of the image. Then I masked off the image itself. The flowers and eggs are actually really easy to fussy cut; I didn’t worry about masking the stems. Then I gently blended some Pumice Stone distress ink before stamping the Brick Wall background stamp (40-137) using Pumice Stone distress oxide. I waited for the ink to dry before removing the masks and colouring the image. To complete my card, I added the sentiment from the stamp set.

My final card (A6 size again) uses a frame from one of my favourite Penny Black die sets (Dainty Dashes – 51-636) and more masking. I actually stamped part of the image a second time so that I could get three egg images under the daffodil rather than two…. In hindsight, I wish I’d coloured that egg in purple or orange or any other colour as it doesn’t really stand out from the very light blue wash that I applied to the background….

Thanks for stopping by!

LucieG.