Technique – ink blending

Featuring ink blending

Loving Koala

Hi everyone!

When I saw the sketch over at the Freshly Made Sketches challenge blog, I thought it would be a great way of using my new Simon Say Stamp/Sugar Pea Stamptember koala stamps. The set is so cute and I am so glad I managed to snag one before they sold out!

Anyway, for my card, I stamped and coloured the cute koala and then carefully cut just under the image so I could slip a strip of My Mind’s Eye paper underneath – so that it looked like he was sitting on the strip. Anyway, I then added a circle from that I cut from a distress oxide background I made a while back and added a sentiment from the set. I still felt like the card needed ‘something’, so I cut out two hearts to finish it off.

I’m also entering this into the current Simon Says Stamp Flickr challenge – anything goes.

Thanks for stopping by!

LucieG.

Autumn smile

Hi everyone!

I love the autumn colours for this week’s Color Throwdown challenge – purple, orange, yellow and green and used the same distress inks as the challenge host, the talented Amy Rysavy. I wanted to created a sponge blended background, with limited brown – always a challenge with this palette! I sponged really lightly to maintain the colours – it looks like I used completely different inks to Amy, doesn’t it?!

I wanted to add some shimmer to my coloured panel so I added just one spritz of distress mica spray. I love the effect you get from just one spray. So difficult to stop at just one though!!

Anyway, I used the fabulous striped leaf die from Altenew and some kraft cardstock to create the inlaid die-cut background and added the embossed Altenew sentiment. But I didn’t feel the card was completely finished. Then I saw the theme for Simon Says Stamp Monday challenge – add metal. So I dusted down my neglected box of brads, added a few and called the card done!

Thanks for stopping by!

LucieG

Fly away with me

So what do you do when you create a blended background that you can’t bear to cut up?

Me? I make a BIG card with it! This card is 20cms x 20cms. But how could I cover up/cut up this:

When I saw this week’s Less is More challenge (take flight), I decided to use my fabulous Tim Holtz/Stampers Anonymous flying witch stamp. I know I wanted to create a night sky/moon background but hadn’t attempted one before. Then, as luck would have it, the talented Vicky Papaioannou did a You Tube video using distress oxide inks to create the very background I wanted yesterday! Perfect timing! Thanks Vicky!

Anyway, I LOVED creating this background. You will see more of them in future, I think!

I made a very large frame for the panel and luckily I have a couple of base cards that were just a tiny bit smaller! Finally I added a sentiment from Krumspring stamps.

Thanks for stopping by!

LucieG.

Kaleidoscope card

Hello everyone!

I loved seeing how the super-talented Debby Hughes used the Simon Says Stamp Kaleidoscope stamp and she was my inspiration for this card.

After embossing the image in white, I coloured over it with four distress inks (spiced marmalade, picked raspberry, abandoned coral and frayed burlap) and then added a coat of Gansai Tambi light gold. It created such a fabulous shimmer! I’ll definitely be using it more often!

I added some vellum and a yellow/orange panel that I had embossed with a Studio Carabelle embossing folder. I added a Lawn Fawn sentiment and lots of sequins to finish it off!

I’m entering this into the current Case This Sketch challenge and also the Simon Says Stamp Flickr challenge – ’emboss like a boss’!

Thanks for stopping by!

LucieG.

First galaxy card

Hi everyone!

The theme for this week’s Simon Says Stamp Monday Challenge is ‘Written in the stars’. I thought this would be a great opportunity for me to attempt my first galaxy background. There are some amazing galaxy cards on Instagram and I have been itching to give it a go.

It turned out to be super easy and incredibly quick!

Step 1

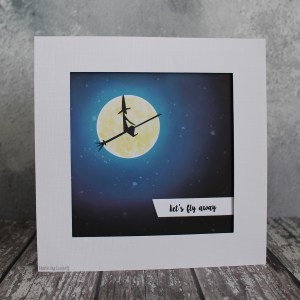
I used a few bright distress inks to create my first layer. I didn’t worry too much about smoothing out the blending as I knew any uneven patches would be hidden by the next layer.


Step 2

 Next, I added a layer of dark ink – I chose to use Black Soot Distress Oxide. On reflection, maybe this could have been a bit darker. I’ll see what that’s like next time I do a galaxy background.


Step 3

I added some splashes of water to give the impression of distant light. I decided that OI wouldn’t add any white splatters to this background as I was going to be adding a busy die cut to the foreground. Otherwise, I would definitely add them!


To finish the card, I added a Technique Tuesday die cut, a Dienamics frame and a sentiment from Hero Arts.

Thanks for stopping by!

LucieG.


Green and…blue leaves?

Hi everyone!

I’ve been playing with my Distress Oxide inks and Color Bursts today and had great fun making different backgrounds for future projects. It was my first time using colour bursts! Oh my! They are amazing! I only have a couple of colours (at the moment) so I decided to combine them with my distress oxide inks to see what happened – love the effect!

I used one of my backgrounds to make this card. Believe it or not, I actually used Lucky Clover distress oxide ink here but somehow it looks much lighter in places – almost like Cracked Pistachio. Weird, but I like it!

I used a fabulous background die from Altenew and inlaid the pieces that I’d cut from my coloured background into a white die cut panel. To finish it off, I added a small piece of vellum and a greeting cut using some of the Altenew inline alpha set.

I’m entering this into the current Color Throwdown challenge – blue, green and white make up this week’s colour combo!

Thanks for stopping by!

LucieG.