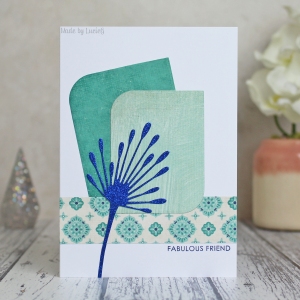
Love and Friendship

This category includes: Valentines Day, engagement, wedding, anniversary, friends

Be Happy

Happy Saturday Everyone!

I’ve been struggling with my mojo recently. I was so motivated to create during my Christmas in July series but it’s just disappeared this month. To be fair, life has been busy with a few home/garden challenges…

To kickstart my mojo, I decided to play along with the Global Design Project, which has a colour challenge this week. I chose a fun set my PaperArtsy (ref EKD03) and got to work. I actually embossed and coloured the image first and then thought about the design. Not the way I usually work and I ended up spending a bit of time trying out various designs before settling on this one. I’m still not completely sure about it, but sometimes you just have to stop and tell yourself, ‘that’s enough’!

Thanks for stopping by!

LucieG.

Hello lovely whittle cat!

Hi Everyone!

Well its been quite the stressful weekend with various house/garden issues; the atmosphere has not been conducive to creating. But I finally managed to make a card against all the odds today!

I’m playing along with a new-to-me challenge, the Global Design Project, which has a CASE the designer challenge this week. I loved the rustic feel of the inspiration card by Janneke de Jong and the design was fabulous. I’m so glad that it helped me get down to creating!

I used the cute Whittle Cat die from Poppystamps plus a couple of butterfly dies from Simon Says Stamp and Memory Box. The sentiment is by Mama Elephant and the embossing folder is by Taylored Expressions.

Thanks for stopping by!

LucieG.

Bride and Groom

Hello everyone!

I’m still playing catch up with the Daily Marker 30 Day Colouring challenge and my personal wood stamp challenge.

For my Day 16 colouring, I decided to use another stamp from my Hero Arts collection! This one is from a set of stamps called Wedding Day. They got a lot of use back in the day when my friends were getting married! I stamped it on Bristol cardstock and coloured it using my Zig Real brush markers and Twinkling H2O paints.

I dry embossed a square die in the centre of my card and adhered the image. I then carefully added a Clearly Besotted sentiment to complete my card.

I’m entering this into the current Addicted to CAS challenge where the theme is wedding.

Thanks for stopping by!

LucieG.

You are Pawesome!

Hi there!

I’m still playing catch up with the Daily Marker 30 Day challenge! This is my rather small amount of colouring for Day 14!

I used one of my Hero Arts wood mounted cat stamps – the Dots Cat. I remember stamping him several times in a circle for a birthday card for my dad back in the day. Things are much easier nowadays with the MISTI!

Anyway, I coloured him with my Twinkling H2Os and added a sentiment die from Simon Says Stamp. I actually think this was be the very first SSS die that I purchased!

Thanks for stopping by!

LucieG.

Floral Silhouette

Hello!

I’m here with my second  Crafts-U-Love DT post for the quarter.

This time, I received the fabulous Penny Black Floral Silhouette stamp set* and a pack of Lawn Fawn ink cubes*. You can see the other cards I made with these products here.

Crafts-U-Love has kindly given me a discount code for you to use for these products – just add LUCIE20 at checkout.

Today I wanted to share some very simple cards I made using repeat stamping.

First up, a good luck card. I selected the leafy frond image and got stamping! Originally I had envisaged it in the soft yellow ink… but once I had covered my card, I felt it was a little too subtle. So I tried a navy/coral combo that I really liked – much more bold! Which one do you prefer?

By the way, the little flower and dot stamps are from previous DT packages – they were from Pinkfresh Studio and Julie Hickey stamp sets. I also added some coordinating Nuvo drops.

The next card I created uses a technique I like to call ‘Baby wipe watercolouring…

I covered a piece of watercolour paper with the Penny Black flower and stem image, using the Lawn Fawn inks. I trimmed the panel to size and then spritzed it with water. I then took a baby wipe and dabbed each image in turn. This process softened the colour without distorting the image too much. In the second photo above, the image on the left has had the ‘treatment’ – I really like the muted effect.

I turned this into a card, by cutting a panel from the centre before adhering the frame to my card base. I adhere the centre panel using some foam tape to raise it. Finally, I added a Creative Expressions die cut to complete my card.

Thanks for stopping by!

LucieG.

Products marked with a ‘*’ were sent to me by Crafts-U-Love for this DT assignment.