Technique – Stamping

Featuring stamping

Newton’s Feathers

Happy Friyay everyone!

I stumbled across a new challenge this week – the Twofer challenge. Basically we need to make two different cards for two different occasions using the same stamps and/or dies…. Interesting!

The January challenge theme is ‘feathers’. Perfect opportunity to dust down my Newton’s Birthday Flutter set which I have had in my craft room for YEARS but have never used. Whyever not? It is such a cute set…

Anyway, my first occasion was birthday and I used the cheeky Newton’s sentiment! I coloured all the images with my Twinkling H2Os and then masked them off whilst I blended some distress ink into the background. In hindsight, I really should have coloured the cat orange like my mum’s sweet cat who loves stalking birds!

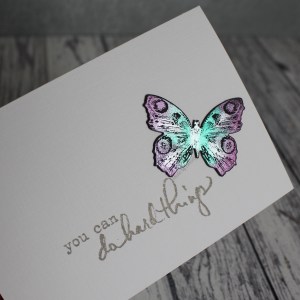
My second occasion is ‘missing you’. Once again I coloured all the images with my Twinkling H2Os and then masked them off before doing some ink smooshing! I cut the image using a My Favourite Things stax die. When I popped it onto the Kraft card, I felt ‘something’ was missing, so I embossed a frame using a larger die from the set – I really quite like how this turned out.

Anyway, I’m also entering these cards into the current Simon Says Stamp Monday challenge (birds of a feather)

Thanks for stopping by!

LucieG.

You are my favourite

Hi there!

The partner company for this month’s Ellen Hutson Mix It Up challenge is Concord and 9th – perfect for me as I have quite a few C9 products!

I bought the turnabout polka dots stamp just before Christmas but hadn’t had time to ink it up – I rectified that today! I decided to stamp it three times (rather than four) to leave a few gaps in the pattern. It’s so pretty – and super fast to use! I then cut it with a die from the Essentials by Ellen Folk Heart set.

I added a C9 sentiment from an Autumn stamp set – the full sentiment reads ‘You are my favourite season’, but I masked off the last word to turn it into a Valentine’s sentiment instead.

I used my tiny attacher to fix the sentiment to the heart and then stuck it to a kraft base card.

Thanks for stopping by!

LucieG.

Just sitting here…

Happy Friyay everyone!

I love the link chain oval dies from the January My Favorite Things release and I could not believe it when they landed on my door mat this morning as I only ordered them yesterday lunch time. Thank you for your great service, Dies to Die For!

Anyway, I wanted to play with them straight away and so I inked up a bear from the sweet Polar Bear Pals set. I coloured him using my beloved Twinkling H2O paints and added some soft ink blending to the background. I lifted some ink using water, but unfortunately, you can’t really see that from my photos – I guess the blending was a little too soft. I added some shimmer to the insides of the chain frame using my Tonic Nuvo Aqua shimmer pen – I love that shimmer!

Thanks for stopping by!

LucieG.

You can do hard things

Hello everyone!

So, if you read yesterday’s post, you may have already guessed that this card is another by-product from my first session playing with Perfect Pearls and Perfect Pearls medium!

I was practicing with some Tim Holtz/Stampers Anonymous stamps and the butterflies turned out so pretty, I just had to use them! I used the coordinating dies from Sizzix to cut them out so I had a pile of embellishments, all ready to go. I just love how the Sizzix dies always cut very closely to the stamped image, don’t you?

When I saw the theme for this week’s Casology challenge (encouragement), I thought a simply sentiment and butterfly would work well. I stamped a sentiment from a Dina Wakley using Lightning Black Brilliance ink and then adhered the butterfly using some foam pads.

Thanks for stopping by!

LucieG.

Playing with Perfect Pearls

Happy Sunday everyone!

It’s time for a new challenge over at AAA Cards. This fortnight’s theme is based on a quote – ‘Let today be the start of something new’ and Happy Little Stampers is our sponsor. You don’t need to include this quote or any other quote on your CAS card, but we’d like you to use it to as your inspiration! Maybe you could use some new supplies? Or a new technique?

For my card, I chose to use a new-to-me technique – stamping/colouring with Perfect Pearls. A few years ago, I bought a couple of sets of Perfect Pearls, mainly for the neutral colours, but the sets were good value and included coloured powders, a couple of brushes and the Perfect Pearls medium, which remained untouched…. until last week!

I must confess, I did go a bit over the top and ended up creating quite a few cards, as it’s such an easy technique! They’ll be popping up on the blog/Instagram over the next few weeks!

Anyway, back to the technique….

I stamped a Carabelle Studio stamp on some black cardstock with the Perfect Pearls medium and the dusted over the image with different coloured powders using the smaller brush from the sets. I used the larger brush to dust away the excess powder but had to resort to the magical Swiffer cloth for a few stubborn bits!

I trimmed down the card to create a square card and added a Penny Black sentiment, again using Perfect Pearls.

My teammates have shared some gorgeous CAS cards on the AAA Cards blog – please drop by and visit their fabulous creations!

Thanks for stopping by – I do hope you play along with us!

LucieG.

Written in the stars – 2018

Hi everyone!

Happy 2018!

I seriously can’t believe how quickly 2017 disappeared. I’m really happy that I managed to spend a lot of time in my craft room and finally set up this blog! I’m looking forward to continuing my creative journey in 2018 and even hope to start doing some process videos – just got to learn how to do them first! I’ll keep you posted!

For today’s card, I used the fabulous Hero Arts star confetti die. I knew that I wanted to create the ‘2018’ from the stars using the inlaid die cutting technique but I didn’t want to spend ages fiddling with die cut stars. So, I embossed the die onto some white card and coloured stars in pencil, erasing multiple times until I had a pattern that I was happy with. Then I ran the die once through my Big Shot – this was enough to cut the stars and still leave most of them in situ when I removed the card from the die. I stuck it lightly to a card base using Kokuyo tape which I knew would give me the flexibility to remove some of the blue stars and replace them with silver ones.

I used the die with some silver glitter paper and got to work replacing the blue stars with silver glitter ones as per my embossed template. This part was really quick – I’m so grateful I thought of creating a template! I must confess that once I was finished, I stuck a few silver stars on top of the base card to reduce the gaps between some stars and make the numbers clearer.

To finish off the card, I added a Hero Arts sentiment which I had stamped using the gorgeous Delicata blue shimmer ink.

Thanks for stopping by!

LucieG