Technique – dry embossing

Featuring dry embossing

Fly, Butterfly, Fly

Hi there!

I’m back to share the card I made for the current Color Throwdown Challenge where the palette is navy, coral, teal and cream.

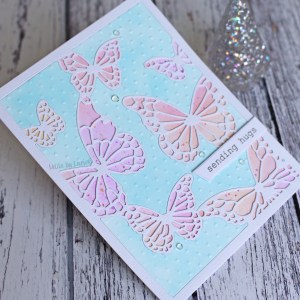
My mojo has been somewhat lacking of late so I turned to my trusty dies! I chose the Birch Press Design Flutter Plate Layer set that I purchased a few years ago. I cut each later from different coloured cardstock and stuck each frame together. I then used the top cover plate die to cut a piece of cream cardstock which I then embossed using a ‘Happy Birthday’ embossing folder.

Finally, I adhered some vellum to the back of my butterflies before adhering the image to a card base.

Thanks for stopping by!

LucieG.

Flutterby Butterfly

Happy Friyay friends!

Today I’m playing along with the current Color Throwdown challenge which has another gorgeous combo – raspberry, lavender, green and kraft.

I used a lot of new supplies – in fact they only arrived this morning! The butterfly die is from Paula Pascual’s new brand, Bright Rosa. I bought the ‘Butterflies Border’ set of 8 dies and couldn’t wait to play with it. After cutting the large image from white cardstock, I used a large die from the set which cuts wings/bases for four butterflies in one go – super quick and easy! I then blended some distress ink (picked raspberry and mowed lawn) and a Gina K ink (lovely lavender) to create my colourful butterfly wings/bases. I added a few splatters of gold paint for that touch of shimmer!

I adhered the butterfly wings/bases to the back to the butterfly border and added a few glitter butterfly bodies that I cut using dies from other butterfly die sets. I then stuck the image to a kraft base that I’d embossed using the Seamless Wave embossing folder from Gemini.

To complete my card, I added a sentiment from Tonic Studios and a few green dots.

Thanks for stopping by!

LucieG.


Believe in Yourself

Hi everyone!

There’s a great sketch for the Paper Players’ current challenge and I immediately thought of my Altenew Halftone Stars set. I created a panel using a John Next Door embossing folder and adhered it to my card base. I then used three star stamps and their coordinating dies and added them, plus a stamped sentiment from the set, to my card.

Thanks for stopping by!

LucieG.

Sweet Tulip

Happy Friyay friends!

It’s been a super busy, but very productive week and I’m looking forward to a long weekend of crafting!

I received a very small order from Simon Says Stamp yesterday including this gorgeous Sweet Tulip die that I have been thinking about getting since Diecember! I had to play with it as soon as possible.

I die cut the image from white card and then coloured sections using ink distress ink. I also used a blended background to cut the die a second time and then inlaid the background panels.

I added the image to an embossed card base and adhered a sentiment from a Clearly Besotted stamp set to finish off my card.

I’m entering this into the current Flower Challenge where the theme is ’embossing’ and I’m also entering this into the current Simon Says Stamp Flickr challenge (‘anything goes’).

Thanks for stopping by!

LucieG.

Butterfly hugs

Happy Sunday!

Today I’m playing along with the current Memory Box challenge. The theme is embossing and so of course I chose one of my favourite techniques – dry embossing… although heat embossing is super cool too of course!

As I was flicking through my Memory Box dies, I found the Floating Butterfly frame. It reminded of a card I made a few weeks ago, when I CASE’d one of my older cards and inlaid embossed die cuts using a Memory Box die. I decided that the large ‘sky’ portions of the die would be great for dry embossing, so got to work!

I created two background panels using Distress Oxide inks: one using Wilted Violet, Abandoned Coral and Dried Marigold – for the butterflies and another using just Tumbled Glass – for the sky.

I die cut the Tumbled Glass panel first and then embossed the large sections of sky using a Cuttlebug embossing folder. Then I die cut the butterfly frame twice from white card and adhered the layers onto the coloured panel. Finally, I inlaid the sky sections – they really make those colourful butterflies pop I think!

To finish off my card, I added a sentiment, also by Memory Box, and a few gems for a bit of sparkle!

Thanks for stopping by!

LucieG.

Embracing the Bright Colours

Happy Saturday everyone!

There’s another great sketch for the Freshly Made Sketch challenge this week – it gave me so many ideas! In the end, I decided to use stamps from my Hero Arts Flowers for Coloring set and a couple of Memory Box dies, but I may use this sketch again for other cards, it’s a fabulous design!

I decided to step outside my pastel-coloured comfort zone and embrace the bright colours! I pulled out the brightest Twinking H2O paints and got colouring. Usually I choose the background paper before I colour as I find it easier (and quicker) to create that way… but today I didn’t and spent a happy time flicking through my old Basic Grey paper pads…. and changing my mind several times before making a decision….

I knew I wanted to dry emboss a centre panel as I had planned to play along with the current Flower Challenge which has the theme of embossing. I spent a little while trying out a few designs before alighting on this Spellbinders / Tammy Tutterow Picnic embossing folder. Yep, this card took MUCH longer than it should have!

Anyway, to finish off the card I used some older dies from Memory Box – the Garland Greenery from 2015 and one of my very first Memory Box sentiments that I got in 2013 – A Little Thanks!

And a big thanks to you for stopping by! Enjoy the weekend!

LucieG.