Technique – die cutting

Featuring die cutting

Copper butterflies

Hello everyone!

Today I’m playing along with a couple of my favourite challenges – the Color Throwdown and Freshly Made Sketches.

The Color Throwdown’s palette this week is very neutral – black, white and copper and so I spent quite a while pondering how I would use it. I remembered my Bellina Butterfly Triptych dies which I hadn’t used for a while and thought they’d be perfect as I have so many butterflies in my garden at the moment. And of course, they would work well with the Freshly Made Sketches challenge. For the fourth square, I decided to use the largest butterfly from the Devyn Butterfly Trio set. Funny story, as I was making the card, I was struck by how similar the butterflies were and congratulated myself for using them all together. When I was putting my supplies away, I realised they are all Poppystamp dies and the packaging actually suggests using them all together! Honestly!

Anyway, to finish off my card, I added a stamped sentiment from Clearly Bestotted.

Thanks for stopping by!

LucieG.


One in a million

Good morning everyone!

It’s time for my next project for the Crafts-U-Love design team and I decided to do something a bit different for today!

I received some pretty Prima Marketing 12×12 paper and the Marianne Designs Rosettes & Labels Collectables dies. Although I have MOUNTAINS of patterned paper, I rarely use it nowadays as I prefer to make my own backgrounds, but I was determined to include it in my DT card for today!

I decided that an ‘impossible card’ would be a great way to show off that pretty paper.

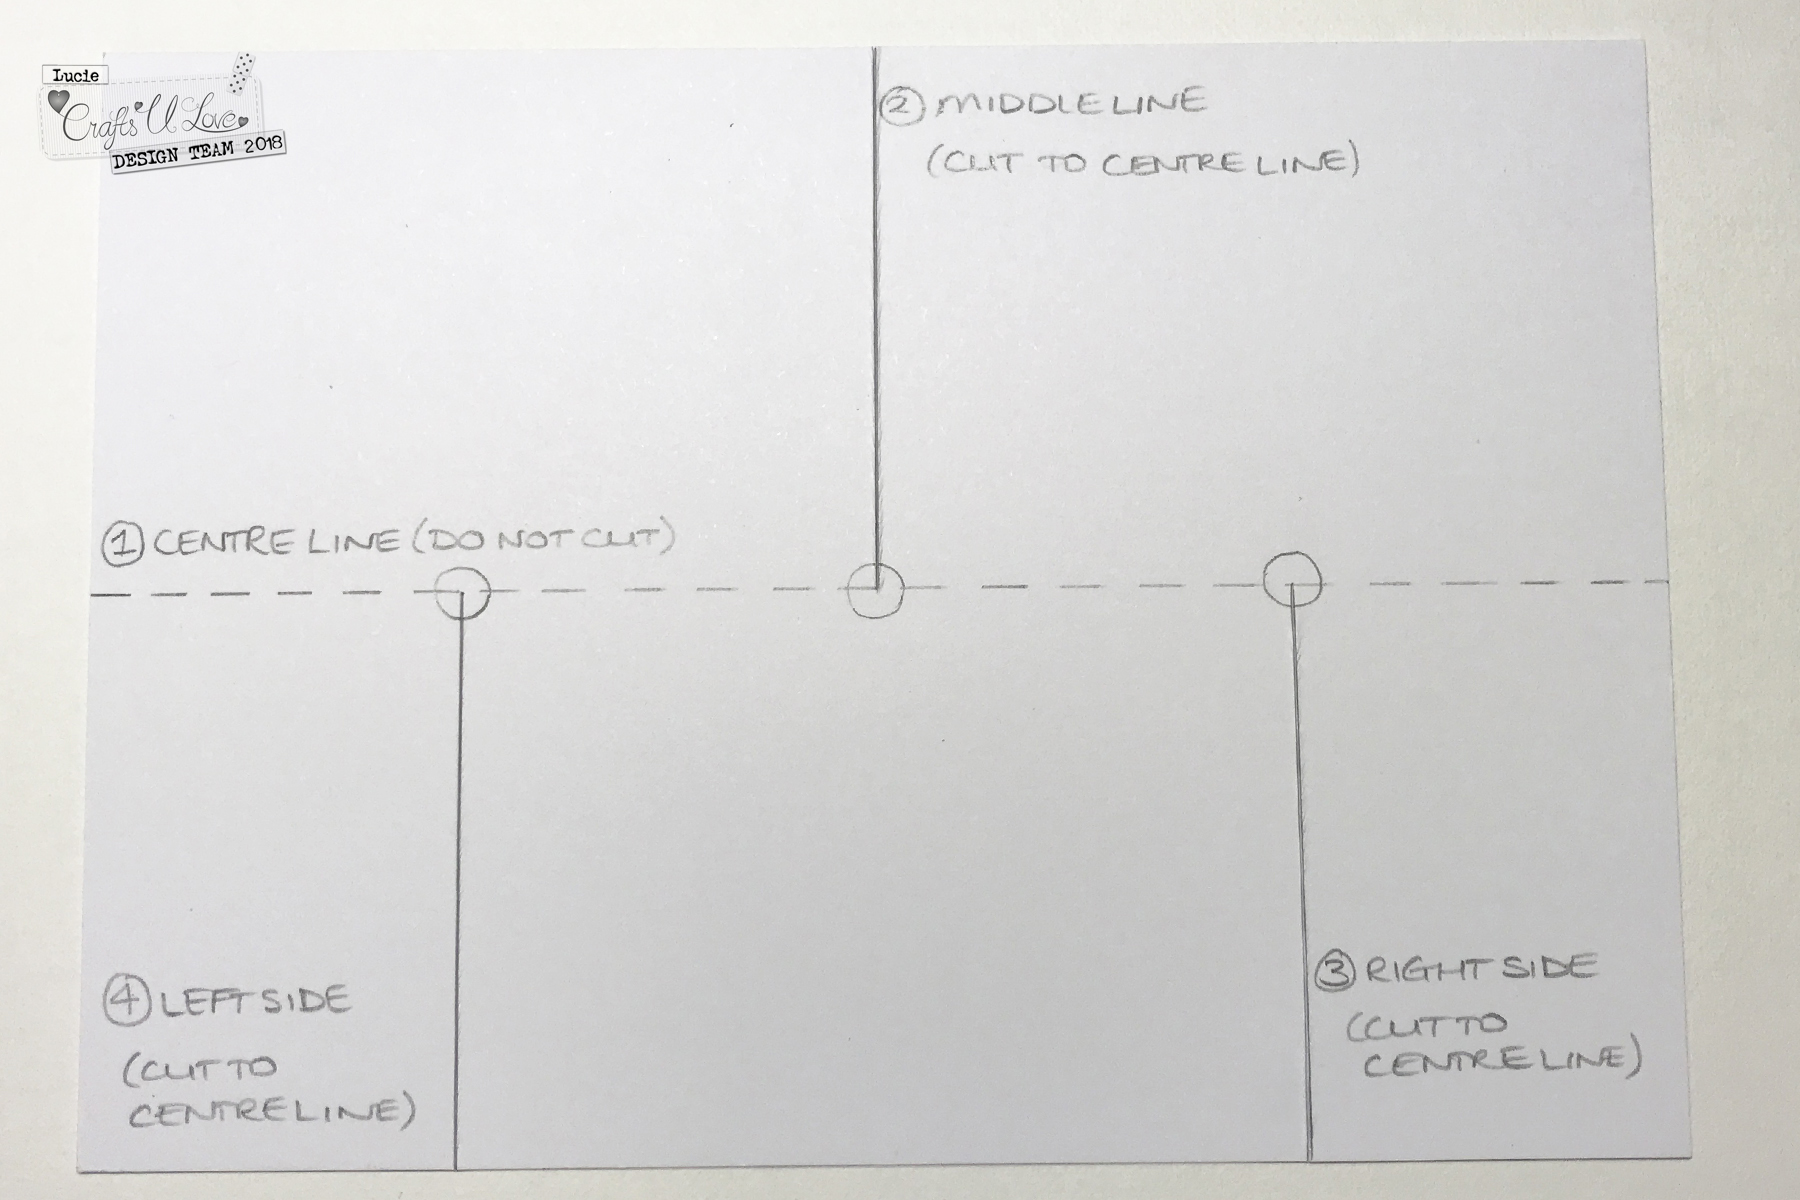
An impossible card is made from one piece of cardstock which is cut and folded in a couple of places. There are loads of tutorials online, but I thought I’d run through my process today. I haven’t included measurements as you can vary them according to the size of your project.  The size of my card was driven by the rosette die which I knew I wanted to use on the bit that stands up

Step 1 – set up and cut your base card

 (Click to enlarge image)

I started by drawing the cut and fold lines on my base card in pencil and then cut it in the three places as indicated by the unbroken line. The key with this project is to make sure that the three vertical cuts reach the horizontal centre (dotted) line.


Step 2 – twist/fold the right side of the card

Firmly hold the left side of the card and then twist the right side of the card up and then back. Fold along the centre – use a bone folder to smooth down the fold/crease.

Step 3 – lift up the centre flap


Lift up the centre rectangle and fold backwards. Use the bone folder to ‘sharpen’ the fold.  The centre flap should stand up of its own accord.

Step 4 – decorate the creation!

And there you have it, the impossible card, ready for decoration! I erased the visible pencil lines and adhered patterned paper. I added the rosette which I had made with the Marianne Design dies and a Penny Black stamp.


 To finish off the card, I added a few die cut stars.


This is what the card looks like from the reverse and underneath (obviously I’d erase my pencil marks before using the card!). I still can’t believe how this can be created from one sheet with a couple of cuts and folds! The card can be flattened and popped in a regular envelope.

Thanks for stopping by!

LucieG.

Supply List

Here are the links to the products I used on my card. Products marked with an asterisk (*) were kindly sent to me to use.

Marianne Designs Rosettes & Labels Collectables dies *

Prima Cherry Blossom 12″ x 12″ Paper – Transformation *

Penny Black Clear Stamp Set – Grateful Heart

Core’dinations Silver Mist 12″ x 12″ Glitter Cardstock

Distress Oxide ink 


Sea you soon

Happy Sunday everyone!

There’s a nautical/beach theme for the current Memory Box challenge which gave me the perfect opportunity to finally open up the Under the Sea Collage die – I’ve had it for a while but for some reason I had never used it!

I started by creating an ocean background with distress oxide inks on glossy paper. I mounted the Under the Sea Collage die on top of the background using funky foam and then added a few seaweed stalks on the background and on the frame. Finally I added a sentiment from a Paper Smooches set.

Thanks for stopping by!

LucieG.

Glittery holly berries


Hi everyone!

I’ve been playing with more Christmas supplies that I bought in the January sales. I’ve really enjoyed Christmas in July and plan to continue it into August!

For this card I used a holly die from Penny Black and a Tim Holtz stencil. The sentiment is by Clearly Besotted.

I coloured the leaves and berries using regular distress ink and used distress oxide to create the stencilled panel. To finish off the card, I added some Nuvo red gliiter drops. I really love how these dry in a beautiful dome! I’ve finally found a way of creating dots and easily adding them to my project when dry – I use waxy paper! I had previously used acetate and a clear block but it was so difficult to remove the dried dots! They comeoff the waxy paper very easily indeed!

I’m entering this into the current Color Throwdown challenge (red, green and grey), Freshly Made Sketches challenge and the Simon Says Stamp Monday Challenge (Christmas in July).

Thanks for stopping by!

LucieG.


Birthday Butterflies

Hi there everyone!

My two new distress oxides inks have arrived and I had to have a very quick play with them straightaway! I did some basic ink blending with them – the Tumbled Glass is gorgeous and l love the Spun Sugar as well! I had been hoping for Dried Marigold, but I won’t have to wait too long for the final release in October and the Spun Sugar is a fabulous ‘consolation’!

I spritzed the blended piece with perfect pearls and then cut it using butterfly dies from Simon Says Stamp and Poppystamps. I decided to play along with the current Case This Sketch Challenge and arranged the butterflies around a Presscut sentiment die.

Thanks for stopping by!

LucieG.


Somewhere over the rainbow…

Happy Sunday everyone!

It’s time for a new challenge over at AAA Cards and our theme this fortnight is ‘somewhere over the rainbow’ – we want to see your rainbow cards! Our sponsor is Stamplorations.

Last year, I took the ‘Rainbow Maker’ class from Online Card Classes and practiced a lot of rainbow techniques – I love using them on my cards, so I really had fun coming up with a card for this theme!

In the end, I decided to use a Poppystamps die cut from a rainbow background that I created with distress inks. My inspiration for today’s card was this fabulous card by the talented Lisa Addesa! To finish my card, I added a sentiment from My Sentiments Exactly and a few gems.

I’m also entering this into the current Poppystamps challenge – ‘Birthday Party’.

My teammates have shared some gorgeous CAS cards on the AAA Cards blog and we are also joined by our sponsor Shery as well as the fabulous Karen from Kenny’s Cards as our Guest Designer. She has some super creations – you must pay her a visit!

Thanks for stopping by – I do hope you play along with us!

LucieG.