Author: luciegcards

Sweetest Fluffles

Hello everyone!

Who remembers the wonderful Fluffles the Cat by Stampendous? Such a cute fun kitty! I still have all the wood-mounted Fluffles stamps I bought probably a decade ago and today I had fun reminiscing about the happy hours I used to spend at a couple of ‘local’ craft stores back in the day. I love how the internet has connected us all and we have so much more online choice nowadays. But I really miss those days in the craft stores.

Anyway, when I saw that the Simon Says Stamp Wednesday challenge had a theme of ‘anything goes’ with Stampendous products, I immediately thought of my Fluffles stamps and decided to use one of them with the sketch from the current Freshly Made Sketches challenge.

I was originally going to fussy cut Fluffles and put him on an action wobbler but in the end I decided on an ‘out of the box’ die cut instead.

I went through my backgrounds box and pulled out the remnants of a Hero Arts background that I created with Satin Pearl embossing powder and distress oxide inks last year and adhered it to my base card before adhering the Fluffles image. To finish off the card, I added a sentiment from My Favorite Things.

Thanks for stopping by!

LucieG.


Birthday leaves


Happy Sunday everyone!

It’s time for a new challenge over at AAA Cards and this fortnight we have a sketch for you. Our sponsor is Happy Little Stampers.

I love this CAS sketch – lots of ‘white space’ with a great focal point! As we’re now into September (how did that happen?), I decided to use a stamp from Happy Little Stampers’ Doodled Flowers set and create an autumn-themed card. I had such fun using my Altenew watercolour paints again. Love how vibrant they are!

I then cut a circle from a square piece of white card to create a frame to go on top of the leafy background. I knew I wanted to raise the frame a little, but didn’t want to use funky foam. Instead, I created another frame from card and adhered one on top of the other to give my card some very subtle dimension. Finally, I added a Happy Little Stampers sentiment.

My teammates have shared some gorgeous CAS cards on the AAA Cards blog and we are also joined by Alex as our Guest Designer. She has some fabulous creations – you must pay her a visit!

Thanks for stopping by – I do hope you play along with us!

LucieG.


Sparkly Peacock

Happy Friyay everyone!

The theme for the current Blog Named Hero challenge is ‘sparkle and shine’. A fabulous excuse to get out the glitter paste, stickles and mirror card….. not that I need any excuse really!

I started by blending some distress ink though a Creative Expressions (That Special Touch) stencil. I then spread a generous layer of Nuvo glimmer paste over the inked background.

I used my go-to inks from Altenew for the Hero Arts Layering Peacock and cut some mirror card using a sentiment die from the March My Monthly Hero Kit. Love that font! Finally I added a few dots of stickles to the peacock’s tail – you can never have too much glitter can you?!

Thanks for stopping by!

LucieG.

Enjoy your day

Hi everyone!

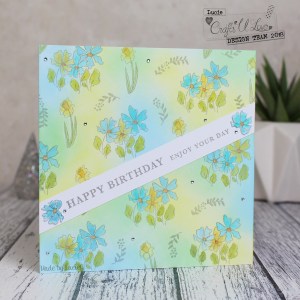
Today I have my next DT post for Crafts-U-Love using the ‘Always Flowers’ stamp set by Pink Fresh Studio. As usual, links to all the products are at the end of my post.

I noticed that my past couple of DT cards have been rather pink, so I was determined to use a different palette this time!

Step 1 – ink blending

Over the past few years, my style has definitely changed and I always tend to make my own backgrounds. My piles of pretty patterned paper are quite unloved, but I just can’t bear to part with them. I’m sure I’ll end up using them at some point (maybe!).

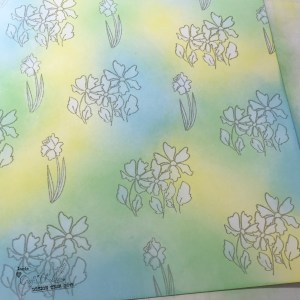
Anyway, when I started on today’s card, I hadn’t decided the size, so I used a larger piece of cardstock and blended three distress oxide inks. This ink is fabulous for blending!


Step 2 – stamping

Once I was happy with my blending, I randomly stamped images from the stamp set.

Step 3 – ink lifting

One of my favourite techniques with distress ink (regular and oxide) is ink lifting. I usually do this with larger images, but it’s easy to do with smaller images too.  I simply ‘painted’ water onto each image and then blotted it off to remove the ink. As usual, when working with smaller images, it’s best to use a small brush for all that detail work, and also ensure that the brush isn’t too wet. I also made sure to wipe off my brush at regular intervals – otherwise I’d start applying some of the colour I’d just removed!!

Quick, easy and effective! Once I finished, I almost stopped and started to assemble the card as I love the effect so much!

Step 4 – colouring

But in the end I decided to watercolour the images using my distress inks, diluted with a bit of water.

After colouring the images, I felt that the gaps between the images was a little too large so I stamped a couple of images from the Pinkfresh Studio ‘Happy’ set.

I then cut down the panel to fit on a square card base. I stamped a Hero Arts sentiment onto a strip of card which I adhered to the base. (The remainder of the background card will go into my ‘bases box’ as I know I can use it on another card!) I then stamped, coloured and fussy cut a couple of flowers and adhered them and a few gems to finish off the card.

I’m also entering this card into the current Pinkfresh Studio challenge as I was inspired by their summer theme and loved their colour palette (although I was determined to stay away from pink!)

Thanks for stopping by!

LucieG.


Supply List

Here are the links to the products I used on my card. Products marked with an asterisk (*) were kindly sent to me to use.

Pinkfresh Studio – Always Flowers stamp set*

Hero Arts – Happy Birthday Messages stamp set

Pinkfresh Studio – Word series stamp set – Happy*

Distress Oxide ink

Distress ink

Brilliance ink

Papermania adhesive stones*

Just keep swimming!

Hi there!

Two posts in one day! I can’t believe I forgot to post my card for the current Poppystamps challenge (‘make a splash’) earlier, but I’m glad that I remembered before the challenge closed!

I decided to use stamps from Poppystamps’ ‘Yes I whale’ set. As it’s the end of summer and people are heading to new schools, unis, jobs etc, I thought it would be appropriate to make an encouragement card, so I paired the whales with a stamp from Avery Elle. After colouring the whale images, I had to fussy cut them because the coordinating dies have gone AWOL – so annoying!

I then created a watery background using the faux alcohol ink technique demonstrated by Tim Holtz/Jennifer McGuire using glossy cardstock, distress oxide ink, water and distress glaze. I really like how this turned out. As you may know, I can’t use the alcohol inks as the strong smell triggers migraines so I love that I can still create a similar look! (I’m actually wondering if I should enter this into the current Ellen Hutson challenge (which is about alcohol inks) – as an alcohol-free alternative!!)

I used the Ellen Hutson strands die to cut a piece of white card which I stuck on top of my watery background before adhering the whales and sentiment.

Thanks for stopping by!

LucieG.

Dancing Snowmen

Hello everyone!

I’m so pleased that I’ve been able to make quite a few Christmas cards over the past couple months – and it’s helpful that some of my favourite challenges have had Christmas themes this summer!

Today I’m playing along with one of them – the Memory Box challenge where the theme is ‘keep cool and carry on’.

I used the fabulous Frostyville Wreath die to cut a background I’d created from some distress oxide inks and them adhered it to a couple of wreaths that I’d cut from plain white card to add some dimension to the wreath. I then cut the fabulous Memory Box/Open Studio Dancing Snowmen from glitter card and altered card and adhered them inside the wreath on a square card. I toyed with adding a sentiment, but I actually felt the card looked fine without one! Besides, I can always add one later before I send it!

Thanks for stopping by!

LucieG.